You can use Dev-Test groups to set up a virtual lab.
Before You Begin
-
Create a Live Mount or VMware Virtual Lab Policy:
To enable IP Masquerading for a Dev-Test Group, the associated VMware Virtual Lab Policy must be configured with IP Masquerading enabled. Therefore, be sure to create your VMware Virtual Lab Policies accordingly before creating your Dev-Test group.
Procedure
-
In the CommCell Browser, expand Dev-Test & DR, right-click Dev-Test Groups and then click New Group.
The Dev-Test Group dialog box appears.
-
On the Enter the Group Name and Description page, name the group, type a description, and then click Next.
-
On the Select Client page, select the Virtualization clients that you want to use as live mounts in the virtual lab:
-
From the Available list, select one or more clients, and then click Add to add them to the Selected list.
-
Click Next.
-
-
On the Select Machines page, select the client machines that you want to include:
-
Choose whether to use a Live Mount Policy or Virtual Lab Policy to create the virtual lab:
-
To create the virtual lab using a Virtual Lab Policy, select Place Machines in Isolated Network.
-
To create the virtual lab using a Live Mount Policy, clear Place Machines in Isolated Network.
-
-
From the Source list, select Backup or Replication.
-
From the Client Machine list, select one or more clients.
-
Optional: Include all client machines. Select Select All.
-
Click Next.
Important:
-
If you selected Place Machines in Isolated Network, the Virtual Lab Configuration page appears.
-
If you cleared Place Machines in Isolated Network, the Live Mount Configuration page appears.
-
-
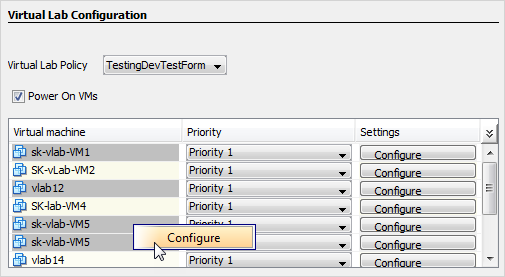
On the Virtual Lab Configuration page, configure settings for the virtual lab:
-
From the Virtual Lab Policy list, select a policy.
To enable IP masquerading for this Dev-Test group, you must select the virtual lab policy that was created with the necessary IP Masquerading configurations. After you select the policy, the Enable IP Masquerading option is displayed on the dialog box.
-
To power on VMs as soon as they are created, select Power On VMs.
-
In the Virtual Machine list under Priority, for each VM in the app, select the order in which you want the VM to power on.
To configure post-processing operations for a VM, under Settings, click Configure:
-
To execute custom scripts after the VM is created, in the Post Operation Process box, specify the location of the script file.
-
To enter a set of credentials for logging on to the computer where the script file is located, click Configure, enter the user name and password, and then click OK.
-
Click OK to close the Live Mount Configure Options dialog box.
-
-
To configure post-processing operations for multiple VMs, press Ctrl and select each VM you want to use:
-
Right-click the VMs and click Configure.
The Live Mount Configure Options dialog box appears.
-
In the Post Operation Process box, specify the location of the script file.
-
To access a VM in the virtual lab, configure the static IP address from the available pool of addresses in the IP Address Settings dialog.
For IP Masquerading, the static IP address must be configured on the source VM, and the remote connection should be enabled.
-
Click OK to close the Live Mount Configure Options dialog box.
NOTE: For scheduled disaster recovery testing, the scripts are placed into the designated proxy and then copied to the individual VMs that are selected for configuration. The results from the scripts (log files) are saved to a folder in the proxy. After the scripts run, an e-mail that contains the location of the proxy folder is sent to the user.
-
-
To enable IP Masquerading for this Dev-Test group, select Enable IP Masquerading, and configure the following:
-
Source IP Range: This is the range of the IP addresses in your private network that will be masked via the gateway VM.
-
Masquerade IP Range: This is the range of the masqueraded IP addresses configured in the associated virtual lab policy.
The masquerade network should have the equivalent static IP range as the source network.
-
-
To continue creating VMs according to priority settings after a VM fails to build, select Continue validating VMs after a failure.
-
To configure the time period to wait before building the next VM according to priority, beside Priority Interval, type or select the number of minutes.
-
To restore from a backup copy (IntelliSnap only), beside Copy Precedence, enter the number of the storage policy copy to use for the restore.
If you leave the default value of 0 selected, the storage policy copy with the lowest precedence is used for the restore.
-
Click Next.
-
-
On the Live Mount Configuration page, configure settings for Live Mount:
-
From the Live Mount Policy list, select a policy.
-
To power on VMs as soon as they are created, select Power On VMs.
-
In the Virtual Machine list under Priority, for each VM in the app, select the order in which you want the VM to power on.
-
To configure additional settings for a VM, under Settings click Configure.
-
To execute custom scripts after the VM is created, click Browse, and then specify the location of the script file.
-
To enter a set of credentials for logging on to the computer where the script file should be executed, click Configure, and then enter the user name and password.
-
Under Network Settings, select No Network, Original Network, or Select Network, and then select a network from the list.
-
Click OK.
-
-
To continue creating VMs, according to priority settings, after a VM fails to build, select Continue validating VMs after a failure.
-
To configure the time period to wait, before building the next VM according to priority, next to Priority Interval, type or select the number of minutes.
-
Click Next.
-
-
On the Summary page, click Finish.