To install the Operating system (OS) updates on HyperScale nodes that are offline, you must download the exact list of OS update packages from the maintenance advantage site on a computer with internet connectivity, and then copy and extract the packages on the HyperScale node to perform the installation.
Before You Begin
-
Download the following packages. Make sure that you download all the parts, including the MD5 checksum.
-
If you use a tape library on the Hyperscale nodes, you must upgrade the corresponding Linux tape driver (lin_tape), when the Kernel associated with the OS is upgraded. For more information, see Tape Library Support for HyperScale.
Procedure
-
Log on to the node that has the
/ws/ddbpath and create the following folder structure under/ws/ddbusing a File Transfer application (For example, Winscp):/payload/CVApplianceThis will be the node from which the upgrade script will be executed.
-
Using the File Transfer application manually copy all the packages to the
/ws/ddb/payload/CVAppliancefolder in the HyperScale node. -
Login to the node using iRMC (HyperScale 1.5) \ IPMI (Hyperscale X) \ Server Console (HyperScale Reference Architecture) and extract the CVAppliance_<MonthYear> folder from the package location to the
/ws/ddb/payload/CVAppliancefolder:cd /ws/ddb/payload/CVAppliance cat CVAppliance_<MonthYear>* | tar -xvf –The above command combines the split .tar files, and extracts it to the local path.
pwd /ws/ddb/payload/CVAppliance/ -
Create a Software Cache directory, if it does not exist.
mkdir /opt/commvault/SoftwareCache -
Create a symbolic link between the CVAppliance folder and the Software Cache:
Note
If you already have a Software Cache on the Hyperscale node, remove it from the Remote Cache list on the CommServe. (CommCell Console ribbon > Tools > Add/Remove Software > Software Cache Configuration > Remote Software Cache tab.) Otherwise the symbolic link will not be created.
ln -s /ws/ddb/payload/CVAppliance /opt/commvault/SoftwareCache/CVAppliance -
Navigate to the following directory:
cd /opt/commvault/MediaAgent -
Execute the following script to compile the packages:
./cvcreate_rpmxml.pyOutput, similar to the following, will be displayed:
[root@hyperscale-hs1 MediaAgent]# ./cvcreate_rpmxml.py node: hyperscale-hs2 node: hyperscale-hs3 Loaded plugins: langpacks, product-id, search-disabled-repos, subscription-manager, vdsmupgrade This system is not registered with an entitlement server. You can use subscription-manager to register. Cleaning repos: jb-eap-7-for-rhel-7-server-rpms jb-eap-7.1-for-rhel-7-server-rpms : jb-eap-7.2-for-rhel-7-server-rpms mono-cv-supported : rh-gluster-3-client-for-rhel-7-server-rpms rh-gluster-3-for-rhel-7-server-rpms : rh-gluster-3-samba-for-rhel-7-server-rpms : rh-gluster-3-web-admin-agent-for-rhel-7-server-rpms rhel-7-server-ansible-2-rpms : rhel-7-server-ansible-2.5-rpms rhel-7-server-ansible-2.6-rpms : rhel-7-server-ansible-2.7-rpms rhel-7-server-extras-rpms rhel-7-server-optional-rpms : rhel-7-server-rhv-4-manager-tools-rpms rhel-7-server-rhv-4-mgmt-agent-rpms : rhel-7-server-rhv-4-tools-rpms rhel-7-server-rhv-4.0-manager-rpms : rhel-7-server-rhv-4.0-rpms rhel-7-server-rhv-4.1-manager-rpms : rhel-7-server-rhv-4.1-rpms rhel-7-server-rhv-4.2-manager-rpms : rhel-7-server-rhv-4.3-manager-rpms rhel-7-server-rpms : rhel-7-server-supplementary-rpms rhel-ha-for-rhel-7-server-rpms Other repos take up 51 M of disk space (use --verbose for details) infile_arch: /tmp/yum.list.noarch infile_arch: /tmp/yum.list.x86_64 -
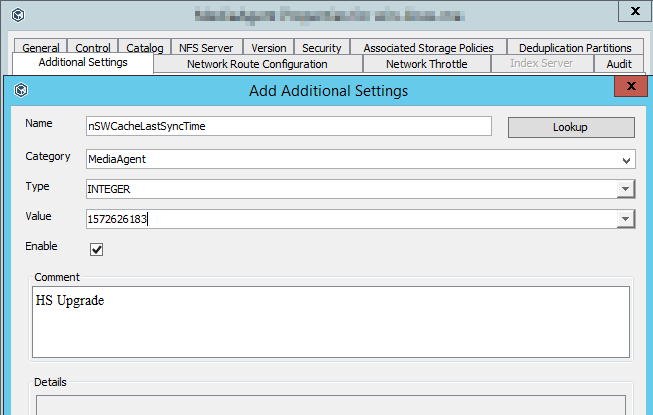
Get the current UNIX time using the following command:
# date +%sThe output will display the current UNIX time in epoch format.
For example:
[root@hyperscale-hs1 ]#  date +%s
1572626183
Note
1572626183is used as an example. This value will change depending on the current time. -
Create the following entries:
# echo "sHyperScaleRemoteCache Yes" >> /etc/CommVaultRegistry/Galaxy/Instance001/MediaAgent/.propertiesvi /etc/CommVaultRegistry/Galaxy/Instance001/MediaAgent/.properties nSWCacheLastSyncTime <Current_UNIX_time>
Where:
<Current_UNIX_time> is the UNIX time obtained in step 8.
-
Verify the value:
 [root@hyperscale-hs1 MediaAgent]# pwd
/etc/CommVaultRegistry/Galaxy/Instance001/MediaAgent
[root@hyperscale-hs1 MediaAgent]# cat .properties
nSWCacheLastSyncTime         <Current_UNIX_time>
Alternatively, manually add the following Additional Setting on the Control Node using the CommCell Console:
Note
The values in setting will not be automatically populated.
-
Set the MediaAgents associated with the nodes in the Maintenance mode. For more information, see Setting the MediaAgent on Maintenance Mode.
Important
Make sure that all the MediaAgents in the storage pool are set in the maintenance mode before proceeding to the next step.
-
On the system console (for example, using KVM, not SSH) of the node on which the remote cache is configured, press Ctrl+Alt+F2 to get to login prompt, log on to the node, and then navigate to the following folder:
/opt/commvault/MediaAgent
-
Update the CDS binaries using the following command:
# ./cvupgradeos.py -upgrade_hedvig_onlyNote
cvupgradeos.pymust be run using the console. Do not runcvupgradeos.pyusing SSH.Alternately update the CDS binaries using the following command in the non-disruptive mode:
# ./cvupgradeos.py -upgrade_hedvig_only_non_disruptiveNon-disruptive mode prevents the nodes from going into maintenance mode and as a result the operational status, especially for restore operations, will be uninterrupted.
-
Update the operating system binaries using following command:
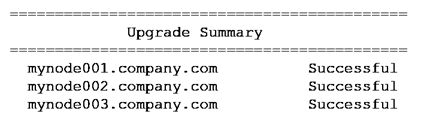
# ./cvupgradeos.py -upgrade_os_onlyThe following prompt will be displayed:
Performing some pre-upgrade checks ... please wait...
You are attempting to perform OS upgrade of cluster nodes.
This will bring down cluster services/volume and reboot the nodes one after the other
Following nodes will be upgraded:
        mynode001.company.com
        mynode002.company.com
        mynode003.company.com
Please confirm if you want to upgrade at this time (y/n):
Important
Verify and ensure that all the nodes in the cluster are listed in the output.
-
Type
yand pressEnterto continue.CommServe VM will now be shutdown and powered off.
The installation process will start. The progress of the installation is displayed. (The sequence is also logged in /var/log/commvault/Log_Files/cvupgradeos.log.)
Note the following:
-
The updates will be installed sequentially on each HyperScale node available in the current cluster.
-
At the end of update installation, each node will be rebooted before moving on to the next node.
-
The remote cache node (or the node from which the OS updates are installed) will be the last node to reboot. The upgrade will automatically resume after the reboot but may take some time to complete the post upgrade operations in this node.
-
-
Once the last node has rebooted, log back into the node and navigate to the following folder:
/opt/commvault/MediaAgent
-
Once the installation is completed, check the status of the installation using the following command:
# ./cvupgradeos.py -statusThe resumed process will be displayed, however, if the process has completed, a message similar to the following will be displayed:
If there is a failure, investigate the reason for the failure in /var/log/commvault/Log_Files/cvupgradeos.log. Correct the issue causing the failure and then rerun
cvupgradeos.pyto install the updates in the failed node. -
Restart the CommServe VM using the following command:
# virsh start <virtual_machine>
For more information on starting the CommServe VM, see Starting and Stopping the CommServe VM.
-
Using the Command Center, remove the MediaAgents associated with the nodes from Maintenance mode. For more information, see Setting the MediaAgent on Maintenance Mode.
-
Remove the following offline repositories as this could consume space on the DDB.
/ws/ddb/payload/CVAppliance/CVAppliance_<MonthYear>*
Result
-
The updates will be installed in all the HyperScale nodes.
-
If the OS version is upgraded, you can verify the OS version as follows:
-
From the navigation pane, go to Manage > Server groups.
The Server groups page appears.
-
The server name, OS version, and other details are displayed for each server in the server group.
-